Speaker Detection Recipes
Overview
The task of speaker detection consists of several different components - distinguishing speech from non-speech, identifying beginning and end of speaking turns, identifying the same speaker across different speaking turns with little data and more depending on the use case.
The first model in our Speaker Detection Suite is the SpeakerMap model. In this section we will address the use of the SpeakerMap model for some common use-cases.
- quick visualisation of speaker transitions - example 1
- per speaker analysis, utilising additional models - example 2
- classic speaker separation - split a mono file into a stream for each speaker - example 3
- handle imperfect results - example 4
Pre-requisites
- DeepTone with license key and models
- Audio File(s) you want to process
- Audacity (optional - example 1)
- Pydub (example 3)
Installing Audacity
If you already have Audacity installed, go straight to the code.
- Mac
- Windows
- Linux
On mac, go to the Mac Download page of the Audacity site.
Reference: https://manual.audacityteam.org/man/installing_and_updating_audacity_on_mac_os_x.html#install
On Windows, go to the Windows Download page of the Audacity site and follow th instructions there.
Reference: https://manual.audacityteam.org/man/installing_and_updating_audacity_on_windows.html#install
On linux, you can build the latest Audacity tagged release from Audacity's source code. But the recommended way is to install from the official distribution repository using a package manager. Most distributions provide Audacity packages.
Reference: https://manual.audacityteam.org/man/installing_and_updating_audacity_on_linux.html
Installing Pydub
If you already have Pydub installed, go straight to the code.
Follow the next instructions to install pydub
pip install pydub
Or install the latest dev version from github
pip install git+https://github.com/jiaaro/pydub.git@master
Or
git clone https://github.com/jiaaro/pydub.git
Or copy the pydub directory into your python path. Zip here.
Reference: https://github.com/jiaaro/pydub#installation
Sample data
You can download this sample audio file for the examples 1-4 below (two men speaking with each other with some moments of silence).
Speaker transitions - Example 1
The transitions output contains the start and end timestamps of each speaking turn. In this example, we are interested in visualising the speaker label for each speaking turn.
After processing the file, we will save the transitions into a .txt file and then use Audacity to visualise the changes between speakers.
This can be useful as Audacity provides an intuitive way to analyse the audio -- for example, to visualise a specific speaker or skip a speaker who doesn't interest you while listening to a long recording. Plotting the transitions enables a quick check of the quality of the results for a given file.
In this case we have chosen Audacity, but you can use many other methods of visualisation or validation of the data with a similar approach.
Remember to replace the values for VALID_LICENSE_KEY and FILE_TO_PROCESS with the correct values before running the example.
from deeptone import Deeptone
import os

# Set the required constants
VALID_LICENSE_KEY = None
FILE_TO_PROCESS = None

assert not None in (VALID_LICENSE_KEY, FILE_TO_PROCESS), "Set the required constants"


# Initialise Deeptone
engine = Deeptone(license_key=VALID_LICENSE_KEY)

output = engine.process_file(
    filename=FILE_TO_PROCESS,
    models=[engine.models.SpeakerMap],
    output_period=1024,
    channel=0,
    use_chunking=True,
    include_summary=True,
    include_transitions=True,
    volume_threshold=0
)

speaker_transitions = output["channels"]["0"]["transitions"]["speaker-map"]

# Inspect the transitions
for transition in speaker_transitions:
    timestamp_start = transition["timestamp_start"]
    timestamp_end = transition["timestamp_end"]
    result = transition["result"]
    print(
        f'Timestamp: {timestamp_start}-{timestamp_end}ms\tresult: {result}'
    )


# Save the transitions to a .txt file
with open(f"{os.path.splitext(FILE_TO_PROCESS)[0]}_labels.txt", "w") as f:
    for transition in speaker_transitions:
        f.write(f"{transition['timestamp_start'] / 1000.0}\t{transition['timestamp_end'] / 1000.0}\t{transition['result']}\n")
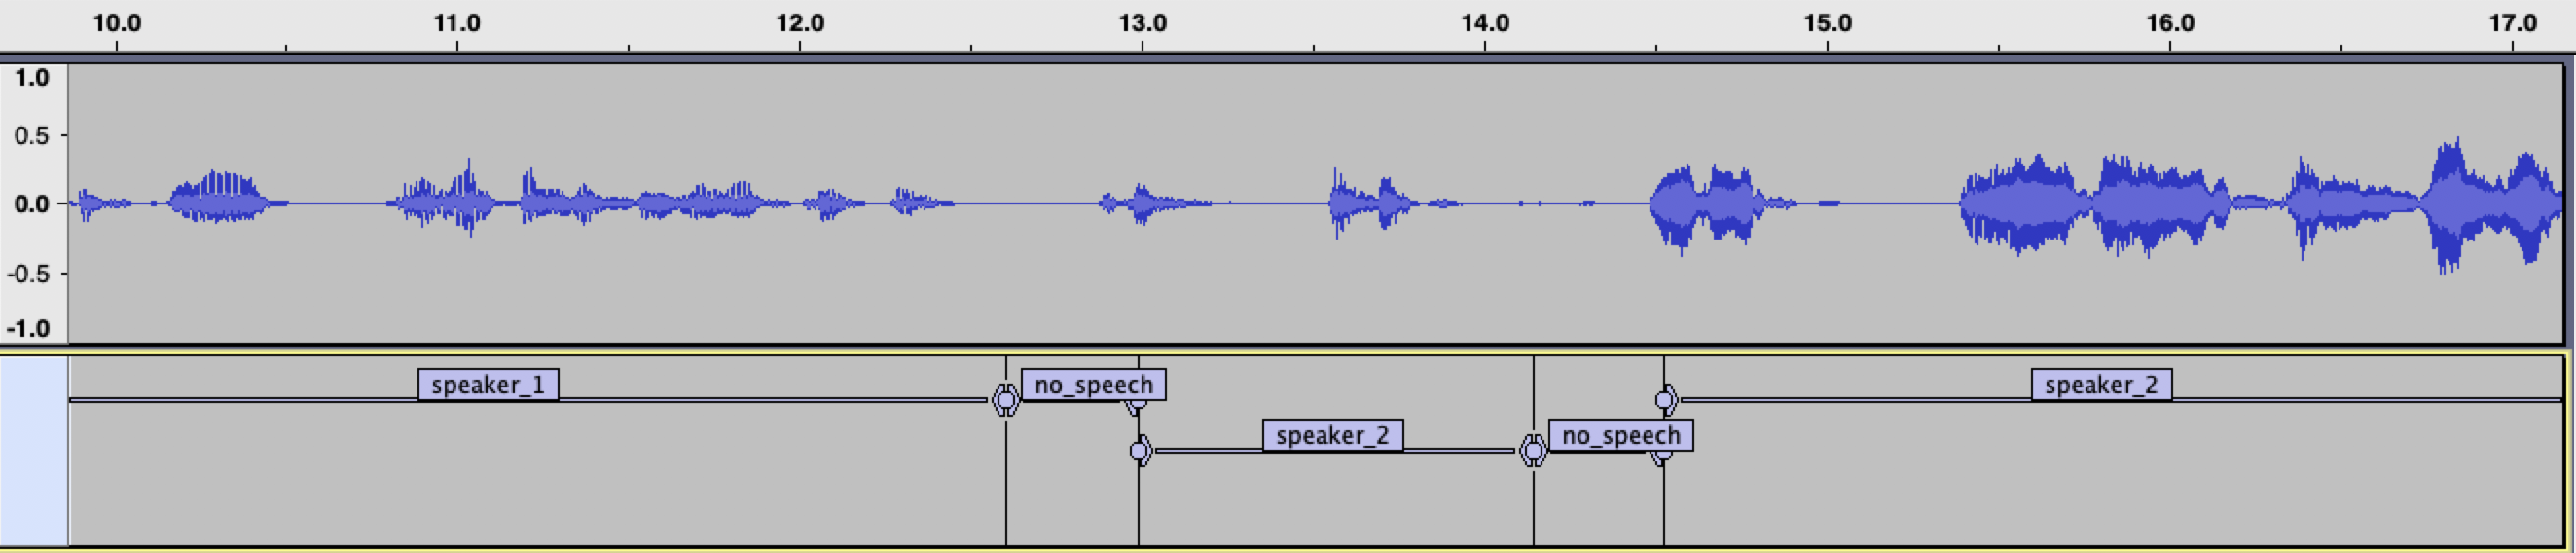
After executing the script, you will find a <audio file name>_labels.txt in your working directory. You can open the audio file with Audacity and then import the <audio file name>_labels.txt file as labels, from File -> Import -> Labels ... . You should be able to visualise something like the following example:
Arousal per speaker - Example 2
The model level summaries provide a quick way to gauge insights across for the whole file. With the addition of the speaker information, you can now construct speaker-specific summaries to gain a new level of conversation understanding.
In this example, we use the SpeakerMap model and the Arousal model to determine who of the two speakers is more energetic. For each time step, the timeseries output contains the speaker label and the arousal result. We show how to combine those to deliver a speaker energy average.
Such an approach can be used to analyse each speaker's engagement over the duration of the recording. With further extensions, you can derive more complex insights, for example how the excitation of one of the speakers affects the response of the others.
Here we are using the Arousal model as an example, but any other model can be used in the same way.
from deeptone import Deeptone

# Set the required constants
VALID_LICENSE_KEY = None
FILE_TO_PROCESS = None

assert not None in (VALID_LICENSE_KEY, FILE_TO_PROCESS), "Set the required constants"


# Initialise Deeptone
engine = Deeptone(license_key=VALID_LICENSE_KEY)

output = engine.process_file(
    filename=FILE_TO_PROCESS,
    models=[engine.models.SpeakerMap, engine.models.Arousal],
    output_period=1024,
    channel=0,
    use_chunking=True,
    include_summary=True,
    include_transitions=True,
    volume_threshold=0
)

timeseries = output["channels"]["0"]["time_series"]

summary = output["channels"]["0"]['summary']

# Inspect the result
for ts in timeseries:
    timestamp = ts['timestamp']
    speaker = ts['results']['speaker-map']['speaker_top']
    arousal = ts['results']['arousal']['result']
    print(
        f"Timestamp: {timestamp}\tspeaker:{speaker}\t arousal:{arousal}"
    )

for speaker_number in range(summary['speaker-map']["speaker_count"]):
    high_part = sum(ts['results']['speaker-map']['speaker_top'] == f'speaker_{speaker_number + 1}' and ts['results']['arousal']['result'] == 'high'
                    for ts in timeseries)

    total_speaker_time = sum(ts['results']['speaker-map']['speaker_top'] == f'speaker_{speaker_number + 1}' for ts in timeseries)
    total_time_aroused = round(high_part * 100/total_speaker_time, 2)

    print(
        f"Speaker {speaker_number + 1} was excited {total_time_aroused}% of the time they were speaking"
    )
Remember to replace the values for VALID_LICENSE_KEY and FILE_TO_PROCESS with the correct values before running the example.
After executing the script on our example data, the following output shows us that second speaker was more energetic than speaker one:
...
Timestamp: 21504        speaker:speaker_2        arousal:high
Timestamp: 22528        speaker:speaker_2        arousal:low
Timestamp: 23552        speaker:speaker_2        arousal:high
Timestamp: 24576        speaker:speaker_2        arousal:neutral
Timestamp: 25600        speaker:speaker_2        arousal:neutral
Timestamp: 26624        speaker:speaker_2        arousal:high
Timestamp: 27648        speaker:speaker_1        arousal:no_speech
Timestamp: 28672        speaker:speaker_1        arousal:low
Speaker 1 was excited 38.46% of the time they were speaking
Speaker 2 was excited 50.0% of the time they were speaking
Speaker separation - Example 3
A classic problem in audio processing of a multi-speaker file is that all insights are delivered for all speakers. Having the ability to separate speakers in different channels or files allows:
- easier design of speaker-specific workflows - irritation in one or multiple speakers may have different outcomes
- analysis of certain speaking patterns - e.g. interruption analysis, speech share analysis, average duration of speaking turns.
- privacy preserving processing - only keep the data you need and discard extra data, e.g. customer data
- more efficient and cheaper analysis - only process and store the data you care about
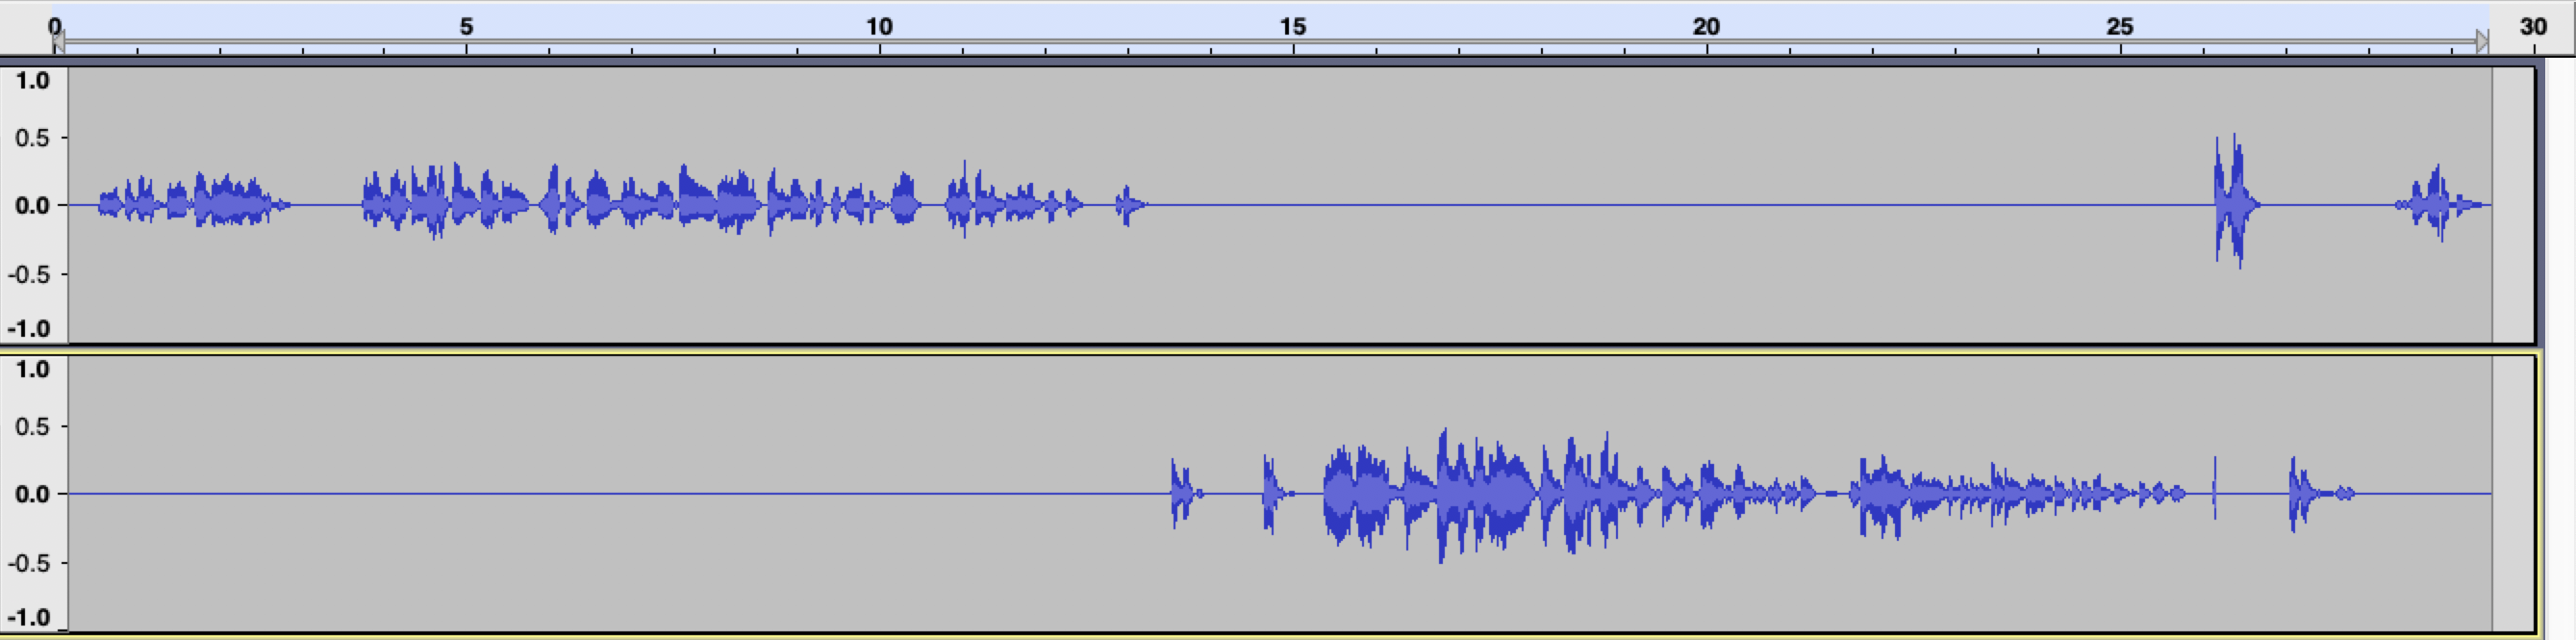
In the following example, we use the DeepTone SpeakerMap model to split a mono audio file with two speakers in two audio files. Each audio file contains the speech of only one speaker, with the voice of the other speakers being replaced by silence.
This is our sample audio file:

After running the script bellow, we see two files for the two speakers, which can be processed further or stored independently:
Remember to replace the values for VALID_LICENSE_KEY and FILE_TO_PROCESS with the correct values before running the example.
from deeptone import Deeptone
from pydub import AudioSegment
import os

# Set the required constants
VALID_LICENSE_KEY = None
FILE_TO_PROCESS = None

assert not None in (VALID_LICENSE_KEY, FILE_TO_PROCESS), "Set the required constants"

# Initialise Deeptone
engine = Deeptone(license_key=VALID_LICENSE_KEY)

output = engine.process_file(
    filename=FILE_TO_PROCESS,
    models=[engine.models.SpeakerMap],
    output_period=1024,
    channel=0,
    use_chunking=True,
    include_summary=True,
    include_transitions=True,
    volume_threshold=0
)

speaker_transitions = output["channels"]["0"]["transitions"]["speaker-map"]


# Open a WAV file
original = AudioSegment.from_wav(FILE_TO_PROCESS)

for speaker_number in range(output["channels"]["0"]["summary"]["speaker-map"]["speaker_count"]):
    isolated_speaker = AudioSegment.empty()
    with open(f"{os.path.splitext(FILE_TO_PROCESS)[0]}_labels_speaker_{speaker_number+1}.txt", "w") as f:
        for transition in speaker_transitions:
            speaker = transition['result']
            start_time = transition['timestamp_start']
            end_time = transition['timestamp_end']
            if speaker == f'speaker_{speaker_number + 1}':
                isolated_speaker += original[start_time:end_time]
                f.write(f"{start_time / 1000.0}\t{end_time / 1000.0}\t{speaker}\n")
            else:
                # Add silence
                isolated_speaker += AudioSegment.silent(end_time-start_time)
                f.write(f"{start_time / 1000.0}\t{end_time / 1000.0}\tno_speech\n")
    isolated_speaker.export(f"{os.path.splitext(FILE_TO_PROCESS)[0]}_speaker_{speaker_number + 1}.wav", format="wav")
After running the script, you will find the separated .wav files, as well as files with labels and timestamps in your working directory.
Handle detection errors with customisation - Example 4
In the following example, the Speaker Map has been applied to an audio file with one speaker, in which there is some background noise from birds. This noise most likely affects the model, which results in small fragments of the speech being labelled as non-existent separate speakers.
Since we are interested in correctly recognizing the speakers and their actual talk time, we had to customise the output to ignore the wrong speakers. The following conditions were defined:
- If the total fraction of the speaker was below 0.1 for the whole audio file or if the duration of a turn was less than a second, we count this result as "unknown"
- If the duration of a turn was less than a second and the previous and next speaker are the same, we count that result as the neighbouring ones
- If none of the conditions was met, the result was not changed
from deeptone import Deeptone
import os

# Set the required constants
VALID_LICENSE_KEY = None
FILE_TO_PROCESS = None

assert not None in (VALID_LICENSE_KEY, FILE_TO_PROCESS), "Set the required constants"

# Initialise Deeptone
engine = Deeptone(license_key=VALID_LICENSE_KEY)

output = engine.process_file(
    filename=FILE_TO_PROCESS,
    models=[engine.models.SpeakerMap],
    output_period=1024,
    channel=0,
    use_chunking=True,
    include_summary=True,
    include_transitions=True,
    volume_threshold=0
)

speaker_transitions = output["channels"]["0"]["transitions"]["speaker-map"]

summary_speaker = output["channels"]["0"]['summary']['speaker-map']

# Set a custom speaker threshold for the probability
threshold = 0.1

# Save the transitions after applying the threshold
new_speaker_transitions = []

with open(f"{os.path.splitext(FILE_TO_PROCESS)[0]}_labels_customised.txt", "w") as file:
    with open(f"{os.path.splitext(FILE_TO_PROCESS)[0]}_labels.txt", "w") as original_file:
        for j, transition in enumerate(speaker_transitions[:-1]):
            result = transition['result']
            fraction = summary_speaker[f'{result}_fraction']

            # Save the original label
            original_file.write(f"{transition['timestamp_start'] / 1000.0}\t{transition['timestamp_end'] / 1000.0}\t{result}\n")

            next_speaker = speaker_transitions[j + 1]['result']
            prev_speaker = speaker_transitions[j - 1]['result']
            speaking_duration = transition["timestamp_end"] - transition["timestamp_start"]

            # Conditional overwrites
            if next_speaker == prev_speaker and speaking_duration < 1000 and result != "no_speech":
                result = next_speaker
            elif summary_speaker[f'{result}_fraction'] < threshold and speaking_duration < 1000 and result != "no_speech":
                result = 'unknown'

            new_speaker_transitions.append({"timestamp_start": transition["timestamp_start"], "timestamp_end": transition["timestamp_end"], "result":result})

            # Save the customised label
            file.write(f"{transition['timestamp_start'] / 1000.0}\t{transition['timestamp_end'] / 1000.0}\t{result}\n")
Remember to replace the values for VALID_LICENSE_KEY and FILE_TO_PROCESS with the correct values before running the example. After you've run the script on our sample data, the label files will be in your working directory.
Using the default transitions, we can spot a non-existent speaker 2 (yellow) appearing for very short burst of time, unlikely for an actual speaker.

After applying our customisation, the result seems a lot more plausible, and is in fact correct.
